Monday, January 28, 2013

Growing Lettuce from Seed


Lettuce is a leafy vegetable that is grown annually in outdoor gardens, or containers.  Lettuce is mostly used for salads or as a garnish for a sandwich.  This nutritious vegetable is rich in vitamin A and potassium.   Lettuce can be grown indoors, outdoors in a garden bed, or in a container.  If you plan on growing lettuce outdoors then provide your lettuce with a minimum of six hours of sun.

Growing Lettuce from Seed


Instructions for Growing Lettuce

When to plant:

Plant lettuce in the spring; mid-March for seeds and if you intend to grow seeds indoors and transplant outdoors then plant the seedlings in early April.  For your fall lettuce crop plant mid to late August for bib lettuce and July to August for romaine lettuce.

Sowing Seeds:

Plant lettuce seeds by sowing them in a prepared garden bed.  Set the lettuce seed on the soil and then use the eraser end of a pencil to push the seed ¼ inches into the soil.  Plant the seeds 15 inches apart.  Water well after all the seeds have been planted. 

Transplanting Seedlings:

Grow lettuce seedlings in rows in the garden bed; dig a hole that is as deep as the root.  Set the seedling in the hole and cover the root ball with dirt. Firm the soil around the stem.  Space the lettuce seedling 15 inches apart and water well.

Caring for Lettuce:

Keep newly planted lettuce seeds and transplants hydrated.  Do not let the soil dry out as it will cause stress on the plant.  It is best to keep the soil evenly moist by not wet.  Water lettuce plants in the morning.  Warning if you have heavy soil and overwater the lettuce then it will rot. 


Harvesting Lettuce

Harvest the lettuce leaves in the morning before the sun is high in the sky.  I like to cut the lettuce heads early in the morning at the soil level.  I will harvest lettuce when the dew is still on the leaves.  I like to believe that this is when the lettuce is not under stress and the leaves have the best flavor.

For leaf lettuce, I will cut off large leaves and leave the lettuce head intact.  That way it will continue to grow.  

Wash the lettuce to remove the dirt from the leaves.  If the leaves are damaged then remove these leaves from the head after the leaves are clean put them in an air-tight container and refrigerator before the leaves wilt.

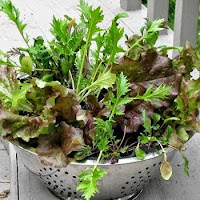
Lettuce container garden
Lettuce Tips:

Type: Annual
Planting Depth: 1/4"
Thin to: 4"
Light: Sun
Days to germination: 10-15
Maturity: 45-50 Days


Sunday, January 20, 2013

Winter Garden Checklist


Late winter is a good time to start making plans for your yard and garden.  Use this time wisely; by making a checklist for all of your garden projects.  Some days in January and February may be warm and I like to use this time to  clean the gardens so they will be ready for planting in spring. Gardening in late winter helps to keep your yard and gardens organized.

In the past I was not for garden checklist.  Last year I did a garden checklist for the fall season and found that it was a good way to stay focused.  The checklist broke down all of the projects that needed to be done and I did not become overwhelmed with the work load.  

 A checklist tells you when to do the task and how to do it from cleaning up the garden beds, pruning the shrubs and sowing the seeds indoors.   

In late winter I make a point to watch the weather forecast.  If there is a warm day then I will plan my work day based on the project on my checklist.  By getting a head start in the yard and garden it enables me to enjoy my flower gardens when spring comes instead of doing cleanup work. 


Late Winter Garden Checklist:


  • Fertilize spring bulbs
  • Prune summer blooming perennial shrubs
  • Prune dormant deciduous vines, fruit and shade trees
  • Remove debris from the gardens and turn over the soil, get the gardens ready for planting
  • Plan my summer garden for vegetables, fruit, herbs and flowers
  • Buy seeds and bare root fruit, roses, shrubs and vines
  • Start seeds indoors 


Monday, December 31, 2012

Garden Tips for Growing Coneflowers


My coneflower garden
Grow Echinacea coneflowers and fill your yard with colorful blooms midsummer through fall.  Coneflowers are one of the easiest and most rewarding native plants, hardy almost everywhere in poor soil and drought tolerant.

Many gardeners grow coneflowers in a prairie or cottage garden with companion flowers daylily, black-eyed Susan, daisy, zinnia, catmint, and bee balm.  The flowers will attract butterflies, honeybees, hummingbirds, all summer long and in the fall songbirds arrive to forage on the big, seeds.


Garden Design
Design your coneflower garden in early spring. Decide on the color scheme and the type of garden. Use colored pencils to indicate the types of flowers. This garden design will help you when you plant your flowers.  Consider adding a water feature; birdbath or fountain as well as a garden bench so you can enjoy this visually appealing wildlife garden.

Where to Plant
Select a garden site that has eight hours of direct sun and well-drained soil.  Prepare the garden site by removing grass, weeds, and rocks. Loosen the soil with a tiller or shovel. Amend the soil with three inches of compost. For a mass planting or prairie garden, dig a trench that is as deep and wide as the nursery container. 

How to Plant 
Remove the flower from the nursery container. Set the container on its side and tap lightly on the side to loosen the soil, roll the container to the other side and tap again.  When the soil is loose gently, remove the plant from the container.  Gently shake the excess dirt from the roots and loosen the entwined roots from the root ball.  

Set the plant in the hole and place the roots on the soil so that they will grow outward. Fill in the hole with soil and firm the soil around the stem of the plant. Water the transplants well. To allow for growth, leave a space of twelve inches in-between plants.


Caring for Flowers

  1. Feed the plants with water-based fertilizer that is formulated for flowers.  Follow the direction on the fertilizers for the amounts needed for your garden size.   
  2. Apply two-inches of pine needles, dried grass clippings or wood bark chips.   The natural mulch will enrich the soil and aid in keeping the soil evenly moist. 
  3. Cut back flowers after a hard frost and apply two inches of natural mulch to your garden bed.
  4. Remove the mulch in spring and fertilize with all-purpose (the flower formula), I use miracle-gro.  
  5. Watch for new growth.  If flowers come in thick and appear overcrowded, divide the clumps and transplant in spring.


Tips

  • Mature plants are drought tolerant.
  • During blooming season, remove spent blooms to encourage more flowers.
  • Coneflowers will tolerate some partial shade in the heat the day.
  • Water transplants daily until roots are established. Then water as needed, or a couple times a week.
  • Weed the garden monthly to stop weeds from competing with flowers for nutrients.
  • Leave seedheads to provide food for songbirds.
  • Grow  in USDA zones 3-9. 


Warnings:

  • Overcrowded coneflowers will attract powdery mildew.
  • Check your garden for the Japanese beetle.  Treat garden pests by dusting with Diatomaceous earth food grade.
  • Buy Coneflowers live plants not seeds at Brecks.nursery.com or Greenwoodnursery.com