Friday, September 15, 2023

Enjoy Zinnia Flowers During the Fall Season


Just because the summer season is coming to an end it does not mean that you cannot enjoy beautiful flowers during the fall season.  There are many flowers that you can plant in September that will add color and interest to your fall containers or feature gardens.

I love Zinnias, do you?.

 Zinnia flowers will add interest to your feature gardens and some zinnias can be grown in containers.  Dwarf zinnias are best for container gardens. 

Here are photographs of zinnia flowers 


The dwarf zinnias come in a variety of colors and will bloom continuously during the fall season and until there is a hard frost.  You would just need to provide your zinnias with at least 8 hours of sun daily and water when the soil is dry to the touch. Plus deadhead all spent flowers and your zinnia plant will give you repetitive blooms. 


This year I sowed zinnia seeds in the spring and then again in mid-August. The flower germinated quickly in the warm soil.   I have been deadheading the spent blooms to encourage new growth and more flowers.  All of the zinnias are still blooming in my end-summer garden.

 Even in cooler weather, the zinnia does not bolt.  Our weather is warm mid 70’s during the day and cool low 50’s at night.  As long as my zinnia gets sun throughout the day they will continue to bloom until a hard frost.

After a hard frost, I will cut back the zinnia plants and deadhead any remaining flowerheads as this is a way to collect seeds for the next spring season planting. Or you can buy seeds online or at your local garden center.

Tuesday, August 1, 2023

Keeping Container Gardens Hydrated During Extreme Heat


This past summer has been extremely hot and, in my area, the average temperature has been in the 100s with a heat index of 108. The excessive heat has caused my city to have water restrictions and we can only water outdoor crops.


I grow vegetables and herbs in containers and containers do dry out quickly so keeping the edible plants hydrated during a water restriction has been difficult.

In extreme heat keep container plants in the shade
this will prevent the leaves from wilting and will
keep them from drying out as long as you water them deeply
in the morning and at night

After a month of extreme heat, my vegetables and herbs are thriving but I did need to be creative with watering and I did provide them with afternoon shade which prevented the soil from drying out.


For my container gardens, I utilized wastewater from the water I used to clean my vegetables indoors in the sink.  I also used rainwater that I had collected in the barrels.


When I did have to use the hose to water my container gardens I watered the plants deeply until the water drained from the bottom of the containers and collected the drainage water to use to water other plants. I watered early in the morning and at night when the temperature was cooler.


All of my container gardens have a thick layer of 3 to 4 inches of organic cypress mulch.  The mulch is a great way to keep the roots cooler and retain moisture.


During the peak afternoon heat, I used my patio umbrellas to provide shade.  I moved all of my container gardens under the umbrella so the intense sun and heat do not cause them to wilt and dry out.


 If you do not have patio umbrellas you can also set your containers under a shade tree or another shade structure like a pergola.  My friend uses a shade cloth and a white cotton sheet for her row covers.

Do your best to protect your gardens from the excessive heat, hopefully, the rain will come soon, and cooler temperatures.

Thursday, July 6, 2023

Grow Sweet Potato Vine Outdoors


Sweet potato vine is an easy-to-grow houseplant but it also can be grown outdoors during the summer months.  Then bring it indoors during the cool and cold months and it will add lovely green color to your space.


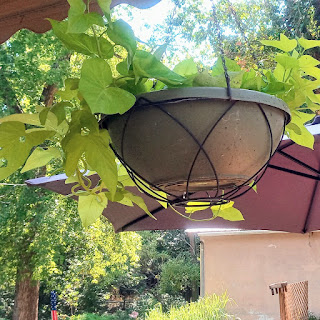
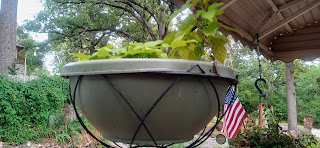
Normally I do not plant anything during the peak summer when the heat is extreme.  But that does not mean that it cannot be done.  Today my brother surprised me with sweet potato vines.  He saw them at Lowes and knew they would make a pretty plant for a hanging container so he bought it for me.


I planted my vines in a hanging basket.  I used miracle-grow potting soil and amended the soil with some manure.  Two vines were planted in the container so that there would be ample space.  After the vines were planted, I watered them well and found the drainage holes at the bottom of the container were okay. 


Cedar mulch was added around the plants to help keep the soil moist since dry soil would be hard on a newly planted sweet potato vine.


I hung the container on my porch where the plants would get six hours of light per day. Morning sun is best if your area is extremely hot.  My porch has shade in the afternoon and then some sun at the end of the day.  As a rule sweet potato vine needs 6 hours of sun but will tolerate partial sun.


If you plan on growing your sweet potato vine indoors then set the container near a sunny window where the plant can get 6 hours of sun per day.  Water to keep the soil moist but not soggy.


If your plant gets too full or vines too long you can trim to control the growth and to keep the plant's shape.

Learn more by reading my other sweet potato vine article 

Wednesday, June 28, 2023

Hydrangea Fungal Disease Prevention

Hydrangeas are easy to grow however you do need to take steps to prevent fungal disease. Here are some garden tips on how to take care of your hydrangea and prevent Fungal Disease.


This past spring my brother gave me a beautiful hydrangea.  It was very healthy with large blooms.  When the blooms were spent I did prune to remove the old blooms and fertilized the plant to encourage new growth.


Everything was great until it rained for three days and then the temperature dropped and the cool damp weather caused my hydrangea to develop brown spots on the leaves and stems. 

Two days ago


it rained overnight, followed by cloudy cool weather. Then a day of heat an humidity and the fungus spread. 


The brown spots were an indication that my hydrangea was infected with the fungal disease Botrytis blight.  


Had I realized that the change of weather could make my hydrangea suspected of fungus I would have brought my container-grown hydrangea indoors and set it in my controlled temperature room that has a grow light.  However, I did not so the hydrangea suffered when the temperature changed. (hard rain, cool temperatures’ then high humidity all in 4 days)

I spoke to the garden center where the hydrangea plant was purchased and they told me that you can prevent this fungal disease by watering the hydrangea at the roots and not watering the flowers or the leaves. 

Also, you must make sure there is good air circulation so don’t plant/grow your hydrangea close to other plants, a wooden fence, or a wall.


Since I am growing my hydrangea in a container I did prune to remove the leaves that showed signs of fungal disease.  I also set the plant on a cement pedestal that would allow the hydrangea to have excellent airflow.


I shopped for a full-spectrum organic product that would treat common garden diseases, blight, black spots, powdery mildew, and peach leaf curl.  That way I could use the fungicide on other plants. 


I bought Bonide Captain Jack's Copper Fungicide, a 32 oz Ready-to-Use Spray for Organic Gardening, and Controls Common Diseases.  The product is ready to use, but you do have to shake well before spraying on the stems and top and bottom of the leaves.  Best to spray when rain is not forecasted.  Directions recommend repeat spraying in 14 days. 

Wednesday, June 14, 2023

Best Way to Get Rid of Poison Ivy

 About a week after the rain stopped we noticed that poison ivy was growing on our backyard fence.   We had to get rid of it because the entire plant can cause an itchy rash.


My husband said he would pull out the entire plant from its roots and dispose of it in a trash bag. This method will work but you may have to do it a few times.  

Before you begin you should put on protected glasses and cover your nose and mouth with a mask.  You will also wear long sleeve shirt and garden gloves. Be sure to wear pants and garden boots.   Best to not have any skin exposed to protect you from getting this toxic ivy oil on your skin and causing a rash.

Dispose of the poison ivy in a trash bag.  Don’t put in your compost because even dried poison ivy can cause you to get a rash and you don’t want to burn it either because it can cause lung irritation. 

 After pulling the poison ivy out by the roots it would be good to treat the area with a herbicide such as Ortho MAX Poison Ivy & Tough Brush Killer.

By treating the soil with an herbicide you will be preventing future growth.

Saturday, June 3, 2023

Sunlight Requirements for Hosta Plants

 I grow hosta plants under trees but this year I noticed that the hosta plants were slow to grow and fill in the space. I watched the sunlight in this garden and sure enough, the plants were not getting enough morning sunlight.


My hosta garden under the maple tree thrived for many years, but that changed when the other trees grew in and blocked the morning sun.  Hosta plants are shade tolerant and will survive if they receive some sun throughout the day. 

Many of my hosta plants prefer 4 to 6 hours of morning sun with shade in the heat of the day, then partial sun at dusk.

Know that hostas have different sun requirements some plants thrive in direct sunlight and can survive a heat wave, while yellow and gold cultivars need 2 to 3 hours of early sun for the greatest color. Variegated hostas need at least 4 hours of direct sun per day to maintain their variegation.

Hosta plants transplanted to garden by the wall. This area will allow the plants to get morning sun and shade in the afternoon. 


Here is a photo poster of a white-tipped Hosta plant that I grew in the morning sun and shade in the afternoon.  The plant was very healthy and looked beautiful in my garden


Hostas generally need at least 6 hours of shade during the hottest part of the day, especially from 11 a.m. to 5 p.m.

Saturday, April 29, 2023

Slogger Yard and Garden Boots


Whenever I go outdoors to walk the dog or to work in the yard or garden I will put on my slogger boots. I think this boot is the best quality-made boot for fit, durability, and long wear.


My sloggers are 8 years old

Slogger garden boots are made from rubber which is waterproof, windproof, and stain resistant.  They do provide some insulation from the wind and the cold.  I wear a sock with them on cool days and my feet are comfortable.

 I prefer a garden boot because it covers my ankles and calves.  Which protects me from insects, dirt and from the string trimmer from hurting my feet.

Know that not all rubber boots are the same, some are intended for rainwear others are meant to be worn in the yard.

 When shopping for a garden boot it’s important to choose one that fits your foot well.   Many stores sell slogger shoes and boots, including Amazon Walmart, and eBay to name a few.  I bought mine at a local garden store.  The sizes were whole only, and the size 8 fit my 71/2 foot perfectly.

I love the floral prints and the colorful designs and the lug sole is great when I work in the mud.   The garden boot helps me to keep my footing.  Slogger yard and garden boots were designed to brighten your rainy, snowy, or muddy day.

Wednesday, April 26, 2023

Growing Tips for Oleander Flowering Shrub

Recently my brother bought me two Oleander flowering shrubs because he thought I would love the beautiful flower.  He did not realize that all parts of the plant contained chemicals called cardiac glycosides which can affect one's heart and cause death if consumed. 

Here are a few of my photographs of my Oleanders


 Plant and grow Oleander in your yard but do take steps when planting that will keep you safe.  The entire plant is so toxic that you must handle it with care.  You don’t want the sap to get on your skin so dress in a long sleeve shirt, and pants and wear gloves that cover your wrists.  A plastic shield to cover your face would also keep you safe from Oleander sap.

 Grow the Oleander in full sun.  Choose an area that has well-drained rich soil.   Space accordingly leaving 3 feet apart as this plant needs plenty of room for spreading.

 It’s a good idea to plant the oleander flowering shrub in the early spring or fall season when the days are cooler.  

 Planting Tips

Did a hole that is two times the size in depth and width as the root ball.  Amend the backfill soil with compost The top of the root ball should be level with the soil.   You can also grow Oleander in a container

Water the newly planted Oleander well so that the soil is evenly moist but not waterlogged.  Water throughout the growing season in the morning so that the soil does not dry out.

 For repeat blooms, you should fertilize the Oleander every two weeks during spring and summer.  I like the miracle grow bloom booster that is attached to the hose.

Other Tips

Oleander will survive in the winter as long as the temperature does not go below 20 degrees Fahrenheit.

Known pests are caterpillars, mealybugs, spider mites, and aphids.

Monday, March 6, 2023

How to Stop Bamboo From Spreading

 Our home came with bamboo growing close to the foundation and we knew immediately that it would need to be transplanted to another area. What we did not know is that bamboo was invasive and that once it was established in your yard nearly impossible to stop it from spreading. 

photo by pixabay bamboo canes


My husband dug up the roots and replanted the bamboo by our patio At first we thought it was a good privacy barrier but soon learned that it was invasive and that we needed to prevent it from spreading. We cut the large bamboo canes with a saw at the soil line and followed that by cutting the new shoots as they emerged.

The following photos show the bamboo canes. You can see that they were planted too close to the foundation and growing out of control.


The best way to stop the bamboo from spreading is to control all new growth by cutting it back as soon as the shoots emerge in the spring and throughout the summer months.  


bamboo shoot appears in spring and summer


 Another way to control the spread is to mow over the new bamboo shoots.  Set your mower at the lowest level then mow over the bamboo, you will need to repeat mowing of the bamboo weekly to prevent it from growing back.  

 Many people will stop the bamboo from spreading by cutting back the shoots and then treating the area with chemicals or herbicides.  This method is a way to permanently kill the bamboo. Be aware that you may have to repeat the herbicide treatment a few times to stop the roots from spreading.

 We find the best way to manage the bamboo growth is to cut back the new shoots and cut the roots that appear just below the soil surface. Then mow the area weekly.