Monday, April 19, 2010

Get Rid of Groundhogs Permanently


Getting rid of groundhogs can be achieved quickly and easily. I discovered a few methods that are effective in permanently removing groundhogs without harming them.

Groundhogs that choose your yard to be their forage area will eat your vegetation or they may burrow under your deck or house.  


Last summer two groundhogs decided to spend the summer foraging in my yard. They also burrowed and weakened my retaining wall.

 
My home resides on a ridge and a ten-foot retaining wall keeps my yard intact and homes secure.


The retaining wall burrow had many living spaces that took up to fifty feet, with many entrances and separate living spaces for the offspring and other family members.

While the groundhog may be cute and the babies adorable, they can cause major structural damage from their vast tunneling system and devour your prized flower and vegetable gardens in under a week.

*****
Tips for Getting Rid of Groundhogs


  1. Install a dog house and get an outdoor dog.  Groundhogs are terrified of dogs.  
  2. Cover groundhog burrow holes in your yard with a cement cap. 
  3. Buy a Scarecrow motion-activated sprinkler.  This pest control product is easy to install and it gets the job done.  Groundhogs are afraid of water and should the rodent come 1000 feet of the scarecrow the sprinkler will emit a powerful burst of water that hits the groundhog and gets them wet.  They are terrified and run back to the forest.  What I like about this product is that it is a humane way to train groundhogs to stay out of your yard.  It does not take much if the groundhog is uncomfortable it will move to another location.

More tips for Getting Rid of Groundhogs


  1. Purchase a live animal trap or clean a used trap with dawn dish soap.  I clean the trap by rinsing it with soapy dawn dish soap and then I rinse it well with the garden hose.  I set the trap out in the sun to dry.  When the trap is dry I put on latex gloves before I handle it.  If the groundhog smells the human scent it will not enter the trap. 
  2. Get the trap ready by laying a newspaper on the bottom of the trap. Fold the newspaper in half so that it fits inside the trap. Bait the trap with a red juicy apple.  I cut the apple in half so that the scent of the apple will lure the groundhog to the trap and encourage the rodent to enter the back of the trap.
  3. Set the trap up against the side of your home, shed, or garage, or conceal it under shrubs or bushes. Cover the trap with a twin-sized blanket but do not cover the entrance. On the day that I plan to trap the groundhog, I will stay close to the trap, I never leave traps unattended. 
  4. Once the groundhog is trapped I will cover the entire trap with the blanket. I find that the blanket that covers the trap comforts the groundhog and they are not as terrified. Put on thick protective gloves and handle the trap carefully, never pick it up from the sides, only carry the trap with the handles.
  5. Relocate the groundhogs to a wooded area that is across the water.  Water will prevent the groundhog from coming back to my yard. I think that trapping is a permanent method to remove groundhogs from your yard and garden. 


Use caution when opening the trap door as the groundhog may show aggression.  In my experience, the groundhog did not want to leave the trap and I needed to coax him out with apples.  I did not rush the groundhog to leave the trap, I waited patiently until he exited on his own.

The above groundhog images I took.  The introduction is a groundhog that was born in May 2011.  The groundhog on the step is approximate 28 months old, the size is quite smaller than a fully grown groundhog. Both groundhogs have been trapped and relocated.

Note:
The motion-activated Scarecrow sprinkler is something every gardener needs for pest control.  It works great for deer, stray cats, raccoons, and groundhogs.


Tuesday, April 13, 2010

Landscaping with Liriope Border Grass


Liriope, commonly known as lilyturf or border grass, is a low growing semi-evergreen perennial ground cover.  This ground cover is a fast-growing and a good choice for erosion control.  Liriope grass will add eye appealing color and movement to your landscape summer through winter.

Grassy foliage of the liriope border grass


I grow this plant throughout my yard as it is a good landscape ground cover.   I have planted as a border along my garden paths and around my oak and maple trees.  I have also added it to my hosta garden and as a border to my ornamental grass garden.   I like the grass-like foliage that grows upward from a clump, and the lavender flower that blooms in late summer make this plant a feature in my garden. 

The flower is long-lived, has no fragrance, and when it fades a cluster of blackish berries will appear. These berries are ornamental and will stay on the liriope during winter.

Here are some photographs of liriope gardens and landscape:
Liriope and Hosta Garden
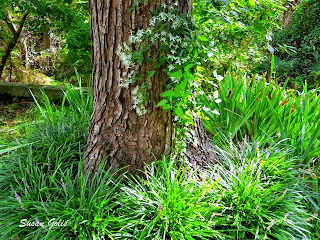
liriope  around maple tree with sweet autumn clematis growing up tree
Spring lirope / trimmed
liriope in bloom, photographed at night


Growing Instructions for Liriope Ground Cover

Choosing a Garden Site
Plant this ground cover in a garden that has good drainage you will also need an area that has part sun to shade.   Liriope does not grow well in the intense afternoon sun, as the leaves, will become scorched, but it does grow well in the morning sun, part shade to shade in the heat of the day and part sun in the evening.

When to Plant
Buy nursery-grown plants or bare roots.  If you intend to do a mass planting then it is wise to buy bare roots as they cost less and they grow quickly. 

Plant in spring after the danger of frost has past or in fall.  Note you can plant liriope anytime during the growing season provided you water it daily until the roots establish.

Soak bare-root plants in tepid water before planting. The water will hydrate the roots and get them ready for planting.  If you plant the bare root in the early spring and fertilize with spray n' grow then it will bloom the first year.

Plant the liriope in a hole that is deep enough to accommodate the roots. Cover the roots with soil that is amended with compost or manure and water well. Space plants 18 inches apart.

Care for your Liriope

Maintain the soil that is evenly moist but not wet.  Apply two inches of mulch around the liriope to aid in maintaining moisture and to prevent weed growth.  Feed with an all-purpose fertilizer in the first week of August.  Cut back in March before new spring growth. Do this by setting your lawnmower blade on high and mow over the plant.

You can also cut back with a weed eater, trim the ground cover to 3 inches, this is a safe height as you do not want to cut too low and damage the crown.

Divide and transplant in spring as needed Fully-grown plants are fifteen inches in height and width.

Warning
Do not eat the ornamental berries.

Learn how to divide and transplant liriope border grass by viewing this YouTube.com video:


Sunday, April 4, 2010

Crabapple Tree Information


spring flowers of crabapple tree
Flowering  crabapple tree

The crabapple is admired for its beautiful spring flowers and also for its late summer fruit. In spring the bloom buds will appear in the shade of reddish-purple and when the buds open the flowers are either white or pink.  

 Crabapple flowers bloom from April to May and the flowers last on the tree for approximately two weeks.  These spring flowers will attract orioles and warblers, the birds feed off the nectar. 

In late summer the tree will produce a small apple that is approximately two inches.  This apple is edible however the fresh fruit has a sour taste.  Many people make jelly from the fruit or they leave the fruit on the tree as forage for birds and wildlife.  


Buying Tips for Healthy Tree

Buy a crabapple tree at your local nursery.  Ask the salesperson if the burlap is natural or if it has a wax coating. If the burlap is natural it is best to plant the tree in the covering however if there is a wax coating it is better to purchase a tree grown in a container.

Planting Tips

Remove the tree from the container and wet the roots. By wetting the roots, you may loosen some of the roots from the root ball. If the roots are stubborn, use your hands untangle the roots.

Gently pull them away from the root ball. If the tree is wrapped in burlap, gently remove the bottom half of the burlap so that the roots are exposed.

Plant the crabapple tree in early spring as soon as you can break ground or in the fall six weeks before a hard frost. 

Grow the tree in a site that has full sun, good airflow and well-drained soil that has a slight alkaline of 6.0 to 8.0.  

Dig a hole that is the same depth as the container and twice the width of the root ball. The hole needs to be wide enough so that the roots are not crowded. Place the root ball in the center of the hole, gently position the roots to grow outward. Add some compost and work the soil around the roots. Fill the hole with the remaining soil and water around the base of the tree. 

Known Disease 
Watch the leaves and fruit for black spots this is a symptom of applescap.  Also look for the symptoms of fire blight.  The branches and leaves will turn black if they are infected with fire blight and this disease if not treated will eventually kill the tree.  

Cedar-apple-rust is very noticeable as there are orange-red spots on the leaves.  Powdery Mildew is more prevalent when there is not enough air circulation or high humidly. 

Check the leaves, flowers and fruit for the white powder fungus.

Care for Crabapple Tree

  1. Care for your tree by keeping the soil evenly moist for the first two years. Water the tree daily with drip irrigation.  The moisture in the soil will encourage a deep rooting.
  2. Apply four inches of organic mulch around your tree. 
  3. Feed your tree in the spring with a fertilizer formulated for flowering trees.
  4. Plant your tree  in the late afternoon when the sun is not intense or plant on a cloudy day.