Friday, October 29, 2010

Sweet Autumn Clematis Growing Guide and Photo's


Sweet autumn clematis is a vigorous vine that is renowned for its late summer vanilla-scented flowers and for the nectar-rich flowers that attract butterflies and hummingbirds. 

Clematis is simple to grow, however, if it is not pruned after the flowering season it can be invasive and will take over your yard.   If you have tried to grow clematis in the past and have failed I would suggest that you try again by planting sweet autumn clematis. 

For a healthy and vigorous climbing clematis, grow in an area where the soil is well-drained, and where the leaves have full sun and the roots are shaded.  

When I moved to the central region of the United States the home that I purchased was a historic home that had many gardens. On my first observation, I noted that the gardens were covered with an invasive vine. With careful inspection I found one hundred vines growing all over the gardens.  

Many of the vines exceeded the length of 36 inches. They were vigorous and aggressive covering everything they came across. They grew up the trellis and the river rock wall. I needed to trim a few back to prevent them from spilling over into the pond. 


 My husband wanted to rip out the fast-growing vines but I said “No”, I told him it was sweet autumn clematis. By the end of summer, the clematis vines were covered with delicate and very fragrant blooms. The fragrance was sweet like vanilla and the vines were laden with so many flowers that from a distance it looked like snow.

Photographs of sweet autumn clematis - my yard and garden.
Trellis made by husband - Clematis with day lilies and grasses


Fast growing clematis fills in trellis 


Front view of trellis: clematis with Four O'clock flowers


Clematis growing up Maple tree with liriope ground cover
Mature sweet autumn clematis vines look thick and woody.


Fragrant blooms in the end of August


Questions and Answers

Where should I grow sweet autumn clematis?
The clematis is eye appealing when growing up the side of a tree or trailing downward over a rock garden. It is also a good choice for steep hills or slopes and will blanket your trellis, arbor, chain link fence or mailbox with lush green leaves and fragrant flowers in late summer. Sweet autumn clematis is deciduous in most areas however if you have mild winters the plant may be semi-evergreen.

When should I plant clematis?
Plant the clematis in USDA growing zones 4-11 in the spring after the danger of frost has passed.  

Can you grow clematis from seed?
Yes start the seeds indoors by planting in a seed kit.  Plant seeds 8-12 weeks before the last frost in spring.  When vines are four inches in length and the threat of spring frost has passed you can plant the sweet clematis flowering vine outdoors.

How do you plant clematis?
For a nursery grown plant you would dig a hole that is the same depth as the container with a similar width. Break up the soil clumps so that the texture is fine. Mix compost or manure with the soil.  

Set the crown of the sweet clematis in the center of the hole with the roots facing outward.  Backfill the hole and water well.   Apply a thin layer of mulch around the stem and roots of the clematis.  

Protect the clematis roots from the summer heat by applying mulch.

Should I grow Clematis on a trellis? 
Yes clematis looks stunning growing on a trellis.  It is best to install the trellis five inches behind the vine. 

The clematis vine will attach itself to the sturdy structure by twisting a runner around the support.  

Make sure that the leaves are in the sun and the roots are shaded.  You can keep the roots cool by applying two inches of mulch around the stem of the clematis.  The mulch will aid in moisture control, prevent weed growth.  

Care for sweet autumn clematis:
Mist the clematis leaves daily and water the roots.  I find it best to water the clematis in the morning and when my summers get extremely hot (mid 90's to 100's) I will also water the clematis in the late afternoon.  During the peak heat, months of summer clematis need to be watered daily. 

Prune clematis after the flowers bloom.

How do you harvest sweet autumn clematis seeds?
In late summer after the clematis has produced a seedpod (see image below) collect the seeds from the brown shell and set the seeds in an envelope for safe keeping.  Seal the envelope and write the name of the plant.  

Keep the seeds for the next spring plantings.

Sweet Autumn Seedpod: Image by SGolis


Thursday, October 28, 2010

Get Gardens Ready for Snow and Ice


If you reside in an area that has severe winters; snow and ice then it is easy to miscalculate where the gardens are especially if they are close to walkways, patios or driveways.  Take the necessary steps and prepare your gardens for snow and ice.  This will ensure that your spring flowers will be healthy.
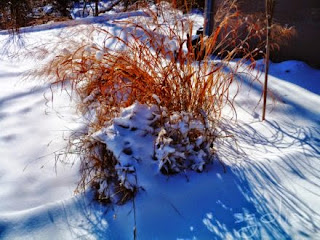
Fountain grass garden in winter
Fountain grass adds winter interest to garden

When I get my gardens ready for winter I like to first survey my gardens to determine exactly what needs to be done. I will make a list of all of the duties and then divide my yard into sections.  

Apply these steps to put your gardens to bed in the late fall and you will protect the perennials from ice that would damage the roots that are close to soil surface.

Start getting your gardens ready for snow and ice by cutting back flowers and plants to the soil line. If there are annuals dig out the roots. Followed by removing the grasses and weeds.

When the garden bed is clean and weed free  cover the top of the garden with an inch of shredded newspaper, then add a layer of organic mulch; dried grass, pine needles, straw or leaf mulch, followed by two inches of manure or compost.

Next install reflective markers for all gardens that are located by patios, walkways, and driveway or door entrances.  Or you can install 3 to 6 foot stakes at the edge of your garden closes to the high traffic areas. Top the wooden stakes yellow or orange flags.

*******


Note: if you grow ornamental grass, astilbe, Autumn Joy sedum, coneflowers, or Hydrangea leave the flowers to dry as they will add eye appealing interest to your landscape  throughout the winter season.


Saturday, October 23, 2010

Backyard Bird Habitat - Plants That Attract Birds


This morning I observed birds flying in an aggressive manner; feathers plumped, squawking excessively, swooping and circling.  The reason for the alarm was brought on by the roar of the chainsaw.  

50 feet from my home I viewed men cutting down mature oak trees.  These Bluejay birds  were angry because the trees had been a nesting area for decades and was part of the bird’s habitat.  

There is no way that I can stop the change of the bird habitat however; I can offer the birds a safe haven that will provide shelter, food and water. I will continue to grow my backyard bird habitat by planting trees for nesting, wind break, flowers for birdseed, fruit bearing trees and shrubs. 

Photograph of my yard and plants:


My bird habitat consists of:

Ornamental Grasses
Coneflowers
Black-eyed Susan
Sugar Maple Tree
Black Walnut, Pecan and Oak 
Elderberry and Nanking Cherry 
Crabapple Tree

Presently the forest birds are under stress but hopefully in a few days they will find refuge at my backyard bird habitat.  


Friday, October 22, 2010

Update Wrought Iron Patio Table with Paint

Wrought iron outdoor furniture is durable and will last a lifetime however the style and the color of the furniture is dated.  You can update the look of your wrought iron patio table with a fresh coat of paint and it will blend nicely with your outdoor living space.

Years ago I inherited my mother’s 3-piece bistro set.  I was thrilled to have it however the style did not go with my home.  The traditional white color stood out like a sore thumb.

I tried to update the look of the bistro table set with pastel floral seat cushions and a small market umbrella.  The patio set looked better but I still did not like the bright enameled white paint. I decided to paint the wrought iron patio table and chairs enameled black. This color would match my iron fence, gate and other garden accessories. 


 How to paint a wrought Iron Bistro Set


Take the furniture apart by using a screw driver or a drill.  Place the nuts, bolts and screws in a zip lock bag and label the outside of the bag with the contents of the bag. Such as:  hardware for chair or hardware for table.

Clean the wrought-iron furniture with a wire brush.  Pay attention to the ornate scroll work as this is where dirt will accumulate..

Hose off the furniture to remove any excess dirt or debris. For stubborn stains; apply dawn degreaser to a damp sponge and wipe the wrought-iron furniture.  Let the soap set for a few minutes before rinsing with water from the furniture.

Place the iron set on a tarp in a sunny area.  Allow the outdoor furniture to dry.

Sand the set if needed, to remove all chipped paint. You will need a smooth surface for painting. (For the removal of rust see Tips.)

Purchase Rustoleum spray paint in the color of your choice.

Spray the wrought-iron furniture sections with the paint using even strokes.  Paint one section at a time and allow it to dry thoroughly.


Allow the painted furniture to dry before applying a second coat.

Tips:
If your wrought iron has oxidation on it you will need to remove the rust with a rust remover.  I use naval jelly, it is a rust dissolver.  You treat the rusted wrought iron with the naval jelly instead of sanding.  Follow the directions on the package.

 Rinse the product well and thoroughly dry the wrought iron furniture before painting.
Paint the wrought-iron furniture in an enclosed area, such as your garage.  Open the windows and doors for proper air ventilation.

Warning:
Spray paint is hazardous to your health, always wear a ventilator mask and protective eye wear when painting and make sure there is good air flow.


Thursday, October 21, 2010

Natural Rose Air Freshener

  Make a natural rose air freshener from rosebuds that you find in your garden or use petals from floral arrangements.  I grow roses so whenever I need an air freshener I can pick the rose buds from my garden.  Not all roses have the same scent so choose your roses based on scent and then mix them with fragrant herbs like lemon balm or lavender.  A natural rose air freshener is good for you, your family, and your pets.

pink rose garden card card


This morning I was out looking at my gardens and noticed that a few of my roses still have blooms. I decided to pick all of the rose buds and petals and prepare for potpourri and rosewater spray.

It is a good idea to freshen the air in your home with the natural rose fragrance as it is better for your family. The store-bought fresheners may have a fragrant scent and they do control odors, however, they are made from chemicals.  The natural rose does not release chemicals into the air, making the natural rose freshener healthier for my family and home.  Plus the scent of the rose stimulates an area in your brain that stores happy thoughts and memories. Everyone who takes in the rose scent will naturally feel happy.

If you are interested in making a natural rose air freshener then it is best to use fresh rose petals. Fresh petals have a more potent fragrance and are not tainted with chemicals to make their blooms last longer.  Keep in mind that the rosebuds that are almost fully open but not quite are the best petals for a potpourri.


Instructions for rose petal potpourri.  
Cut roses with a long stems.  The rose should be almost open but not fully open.  Dry the roses by tying several stems together with a string.  Hang the roses from the sting and allow them to dehydrate in a cool and dry area for two weeks.  After two weeks check to see if the rose petals are dry, if so place the dried rose petals in a glass rose bowl. Add a few drops of essential rose oil and mix well. Complete your potpourri mixture when you are satisfied with the fragrance.  Fill decorative glass bowls or jars with the potpourri. 


Friday, September 24, 2010

Keep Stray Cats Out of Yard and Garden


Keep cats out of your yard and garden by using humane methods rather than acts of cruelty. 

A few years ago a client of mine was having problems with neighborhood cats that would enter her yard during the night and lounge on her patio furniture, use her plant containers as a litter box and mark her flower gardens. Needless to say my client had had it with the cats and was ready to kill them. 

I offered my pest control services to remove the cats from her property without harming a hair on their furry little heads and she accepted my contract.


Stray cat on Deck Image by Sgolis

In order to permanently remove the neighborhood cats from the yard I needed to determine why they cats marked her yard as their territory. 

I took a journal and walked through her entire yard and discovered that my client’s yard was a cat habitat. 

There was overgrown shrubs with clumps of blue fescue ornamental grass that would provide shelter and bedding for the cats.  Her deck also provided protection as it was in a location where the wind was blocked and the cats could get under the deck to set up house.  Her yard was a cat sanctuary as it had shelter, reliable water source, and food source from the pet bowl that was left out overnight. 

I made a note of the tasks that needed to be completed. I was certain that if I manicured her yard by pruning shrubs, low hanging tree branches and cutting back the brush it would deter many cats.  My plan was simple; I would make her yard and gardens uninviting and I would remove the food source.


Make your yard unappealing to cats by manicuring your lawn, garden and pruning shrubs.  

Remove all of the brush and you will remove the comfortable hiding places.  

Purchase poultry netting or chicken wire. Cut it so that it fits around your plants in your gardens and your ornamental shrubs.  

Apply mulch on top of the chicken wire.  This method is affective because when cats go to dig for a place to their business the wire will annoy them.   Cats do not like walking on chicken wire and after a few tries they will learn that this area is off limits.

Remove the food source by feeding pets indoors and emptying the water bowl at night.  If you have a water fountain, shut it off at night so there is no running water.  If you have a small pond, spread a large layer of chicken wire across the top of the pond and secure the wire with hooked stakes that are pounded into the ground or set the edge of the wire under large rocks that are located at the ponds side.  

The idea is to prevent the cats from getting to your water source or foraging from your pond.  Koi fish will attract cats to your yard.  A hungry cat will move to another location when food source in eliminated.

Peppermint plant
Grow herbs that naturally repel cats.  I found that peppermint, spearmint, lemongrass, geranium, rue, lavender, garlic, onions and thyme are plants that emit a scent that is revolting to cats.  

Cats tend to avoid the areas in the yard where these herbs grow.  For an effective barrier you would need to grow these plants in several areas of your yard.  The idea is make the cats uncomfortable.  

Choose a sunny location and plant a representation of these herbs.  You may want to grow them along the fence, in the same location where the cats generally enter your yard.  You may also want to grow these herbs in containers and set them close to your patio or outdoor living space.  These fragrant herbs are an effective method for keeping cats out of your yard.


Keep cats out of your yard by marking your yard and gardens with Shake Away Cat Repellent Coyote/Fox Urine . If you treat the perimeter of your yard with the shake away for cats they will pick up the scent and will avoid your yard.  However not all cats are afraid of predator urine.  Many housecats do not have the sense of scent and thus do not fear the scent of fox or coyote.  

I have used this product and it has proven to be useful in repelling feral and woodland cats.   The best way to apply this product is to use it sparingly in yard and garden.  Shake the granular treatment on the shrubs, trees, fence post, a container, or anywhere that a coyote of fox would mark.  I apply the shake-away by marking a barrier around my yard.  The product is effective as long as it does not get wet. 

Cats keep cool on brick patio:  Image Sgolis
Another way to keep cats out of your yard and gardens is to purchase a Contech  Scarecrow Motion Activated Sprinkler.   

This cat prevention is easy to install and it gets the job done.  Cats are afraid of water and when the cat comes within 1000 feet of the scarecrow the cat gets wet. 

The scarecrow water sprinkler is a great method for keeping cats out of your yard and garden however if you are in a water restricted area this sprinkler may not be right for you.  In this case you may want to get rid of the cats by using a motion activated ultrasonic  animal repellent.  For this animal repellent you will need to install in a location where the cats frequent.  

This product needs to be at least three feet off the ground. You can mount on garden stake, the side of your garage, tree or fence post. The high frequency alarm is a good way to stop cats from marking or hanging out in your yard and garden.  This product works as long as you put them in the right location and have enough alarms to provide protection for your entire yard.  You may need two in the backyard and one in the front yard.


Tips:

  • Before you implement any cat deterrents it is best to determine if the cats hanging out in your yard are stray, feral or house cats. If you have cats frequenting you yard I would suggest that you ask your neighbors if they know of the owner of the cat or cats that are camping out in your yard. 
  • I find the best way to remove cats from your yard is to make your yard uncomfortable and not welcoming to cats.
  • I did not block the entrance under the deck because of the life factor.  A cat could be hiding under the deck and I would have no way of knowing.  
  • If you suspect a cat is living under your deck you may want to set up a trap to catch the cat and then release the cat away from your yard or surrender to a no kill shelter.  
         
Warning:  
  • Never attempt to crawl under a deck, there may be a raccoon or feral cat living there and they could attack you. If you are bitten you will need to undergo rabies treatment. 
  •  Many people repel stray cats with mothballs.  This repellent is toxic to cats.  If the cats should touch the mothball with their paw and then lick their paw the cat will become seriously ill; vomiting, abdominal pain, organ failure, swelling of the brain, seizures, coma and death.  This is not a humane way of repelling cats. 


Thursday, September 23, 2010

Spring Bulb Container Tips


A spring bulb container garden is a nice way to welcome guests to your home. Container gardens are a good choice for people who have a small yard or live in apartments; you can easily grow a variety of spring bulbs to enjoy even if you have limited space.  Bulb container gardens are easy to maintain, all you need is a container with drainage, potting soil, bulb fertilizer, water, and sunshine.   


Instructions:

Choose a container that meets your needs; has ample room for your flowers to grow and has water drainage holes.  You will also need high-quality potting soil and fertilizer.

Buy spring bulbs from online nurseries or from your local garden store.  If you shop online always buy the plant that has the highest rating and with 4 or 5-star customer reviews.  Choose an eye-appealing bulb arrangement for your container, some people like to grow all the same spring flowers; red tulips, yellow daffodils, fragrant hyacinths, and cheerful crocus mix.  While others grow a variety of spring-blooming flowers; red Impression, golden Apeldoorn, and Daydream orange tulips will look stunning when grown with purple Muscari or daffodils grown with white wood hyacinths or paperwhites.


When planning your spring bulb containers consider all the growing stages of spring, such as early, mid, and late spring bulbs. For a container garden for a full season of color, you should purchase a few varieties of spring bulbs such as daffodils, tulips, grape hyacinth, and crocus. 


Tips

Plant the bulbs at the right depth, the general rule is double the size of your bulb and that is how deep you would plant it.

Grow bulb containers indoors on a southern windowsill or you can grow with artificial lights.

Make several bulb containers and keep them over winter in your greenhouse.  In spring when the flowers begin to grow give the container gardens to friends and family as gifts or sell them at the farmers' market or church bazaar. Growing spring bulb containers for profit would be a great part-time business.